Amazon CloudWatch is a monitoring and observability service that Amazon Web Services (AWS) provides. It monitors log files, collects and tracks metrics, sets alarms, and triggers actions to help AWS users ensure the health and performance of their applications and infrastructure resources. CloudWatch integrates with various AWS services, such as Amazon EC2, to provide comprehensive monitoring and observability. It collects logs from Amazon EC2 instances through the CloudWatch Logs agent installed on the EC2 instance. This agent continuously monitors log files and streams them securely to CloudWatch Logs in near real-time.
Amazon EC2 user data is a feature that allows users to provide initialization scripts or commands when launching EC2 instances. User data can be helpful to automate tasks such as installing software, configuring settings, or running scripts during the bootstrapping process of the instance.
In this note, I demonstrate how to install and configure the Amazon CloudWatch Logs agent on an Amazon EC2 instance using the user data script. The logic inside the user data script is to:
1. Download the Amazon CloudWatch Logs agent installer.
2. Install the agent.
3. Download the config.json from the SSM Parameter store.
4. Configure and start the CloudWatch Logs agent service.
I automated the resource provisioning process using Terraform, my favorite IaC tool.
This use case can be classified into seven steps to create all the required AWS Cloud resources:
1. Create the network stack
2. Create the security group and egress rule
3. Create an Amazon CloudWatch Log Group
4. Create an AWS Systems Manager Parameter Store parameter
5. Create an IAM role to attach the Amazon EC2 instance
6. Update the user data script to install and configure the CloudWatch Logs agent
7. Create the Amazon EC2 instance
If you want to follow along, please refer to the Terraform code in my GitHub: kunduso/ec2-userdata-terraform/tree/add-cloudwatch-agent. Please take note of the GitHub repository branch.
Step 1: Create the network stack
The network components include the Amazon VPC, a public subnet, a route table, an Internet gateway, and a route in the route table to the Internet using the Internet gateway.
 Step 2: Create the security group and egress rule
There is only one
Step 2: Create the security group and egress rule
There is only one egress rule attached to the Security Group, which enables traffic from the VPC to access the Internet (using the Internet gateway).
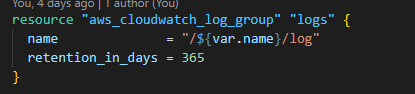
 Step 3: Create an Amazon CloudWatch Log Group
The log group stores logs sent by the CloudWatch Logs agent running on the Amazon EC2 instance.
Step 3: Create an Amazon CloudWatch Log Group
The log group stores logs sent by the CloudWatch Logs agent running on the Amazon EC2 instance.
 Step 4: Create an AWS Systems Manager Parameter Store parameter
 The CloudWatch Logs agent accepts a
 JSON file with keys and values to configure the service. The JSON file is stored inside the AWS Systems Manager Parameter and downloaded by the logic in the user data script.
Step 5: Create an IAM role to attach the Amazon EC2 instance
I explained the logic of attaching an IAM role to an Amazon EC2 instance in my note -attach-iam-role-to-amazon-ec2-instance. The IAM role attached to the Amazon EC2 instance requires an assume_role_policy. It also requires a list of managed and custom policies. These are:
(a) A custom policy that allows access to the SSM Parameter Store parameter.
 (b) A managed policy
 arn:aws:iam::aws:policy/CloudWatchAgentServerPolicy that allows the Amazon EC2 instance to send custom logs from the instance to Amazon CloudWatch.
(c) Optionally, you may attach the managed policy arn:aws:iam::aws:policy/AmazonSSMManagedInstanceCore to enable logging into the Amazon EC2 instance using Session Manager from the AWS Cloud console. For details, please refer to this note -access-amazon-ec2-instance-using-session-manager.
Step 6: Update the user data script to install and configure the CloudWatch Logs agent
The user data script is located as a template file in the user_data folder. The script is configured to download the Amazon CloudWatch Logs agent and AWS CLI installers and install them one after the other. Then, the user data script downloads the SSM Parameter Store parameter value, which is the config.json file, and stores it as a JSON file on the Amazon EC2 instance. Then, it configures the Amazon CloudWatch Logs agent and starts the service.
Step 7: Create the Amazon EC2 instance
The last step is to create the Amazon EC2 instance with the properties specified in the previous steps, like the security group, the subnet ID, the instance profile, and the user data script. The user data script, as you can examine in the image below, accepts an SSM Parameter Store parameter name. This parameter is referenced in the user data script to download the JSON configuration file for the Amazon CloudWatch Logs agent.
 After Terraform provisioned all the resources, I waited 5 minutes before accessing the Amazon CloudWatch log group from the AWS Console. That was sufficient time for the Amazon EC2 instance user data script to download the installers, install, and configure the CloudWatch Logs agent service.
And as expected, I could see the logs from the Amazon EC2 instance.

Best Practices
I implemented a few best practices, such as:
1. Attaching an IAM role with Amazon EC2 instance.
2. Using least privilege IAM permissions.
3. No ingress rule for any IP address on any ports.
4. Automate the installation process via the idempotent user data PowerShell script.
However, there is one more best practice to consider when creating an Amazon EC2 instance:
- Remove public IP address: The Amazon EC2 instance has a public IP address since it requires Internet access to download the AWS CLI installer. However, suppose the installer is stored in an Amazon S3 bucket (such as the Amazon CloudWatch agent installer). In that case, we can use VPC Endpoint to access the installer. That way, the EC2 instance won't require a public IP address. It is a security best practice to avoid having Amazon EC2 instances with public IP addresses because they can be reached from the internet, making them vulnerable to attacks.
Please note that I could have used a NAT gateway in this use case to prevent the Amazon EC2 instance from having a public IP address to access the Internet, but that would have deviated from the primary use case.
And that concludes this note. If you have any questions or suggestions, please do not hesitate to contact me via the comments below.